Dynamic Datagrids is a new feature that allows users to create data capture interfaces using a low-code tool. These interfaces can be embedded into longitudinal health profiles and encounter forms, making it easier for healthcare professionals to collect and manage member data.
With Dynamic Datagrids, users can create custom data entry forms by selecting and arranging fields using a drag-and-drop interface. The fields can include a variety of data types, such as text, numbers, dates, and checkboxes. Users can also define validation rules to ensure data accuracy and completeness.
One of the key benefits of Dynamic Datagrids is its flexibility. Users can create multiple forms for different types of data, and they can add or remove fields as needed. This allows healthcare professionals to capture the data they need to make informed decisions about member care.
Dynamic Datagrids can be embedded into longitudinal health profiles, which provide a comprehensive view of a member’s health history over time. This allows healthcare professionals to track changes in a member’s health status over time.
The feature can also be embedded into encounter forms, which are used to document a member’s visit to a healthcare provider. By capturing data in real-time, healthcare professionals can make more informed decisions during the visit and provide better care.
Creating and Managing Dynamic Datagrids
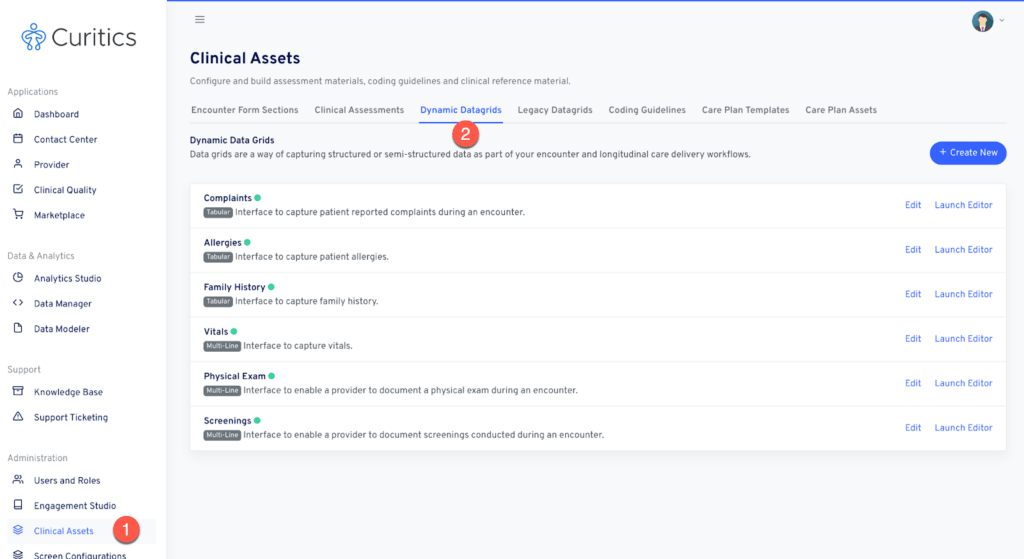
To modify or create encounter form sections, navigate to the “Clinical Assets” from below Administration in the dashboard side panel.
If you already have a Dynamic Datagrid that you would like to edit, click the “Edit” link adjacent to the name. If not, click on the “Create New” button to create a new Datagrid.
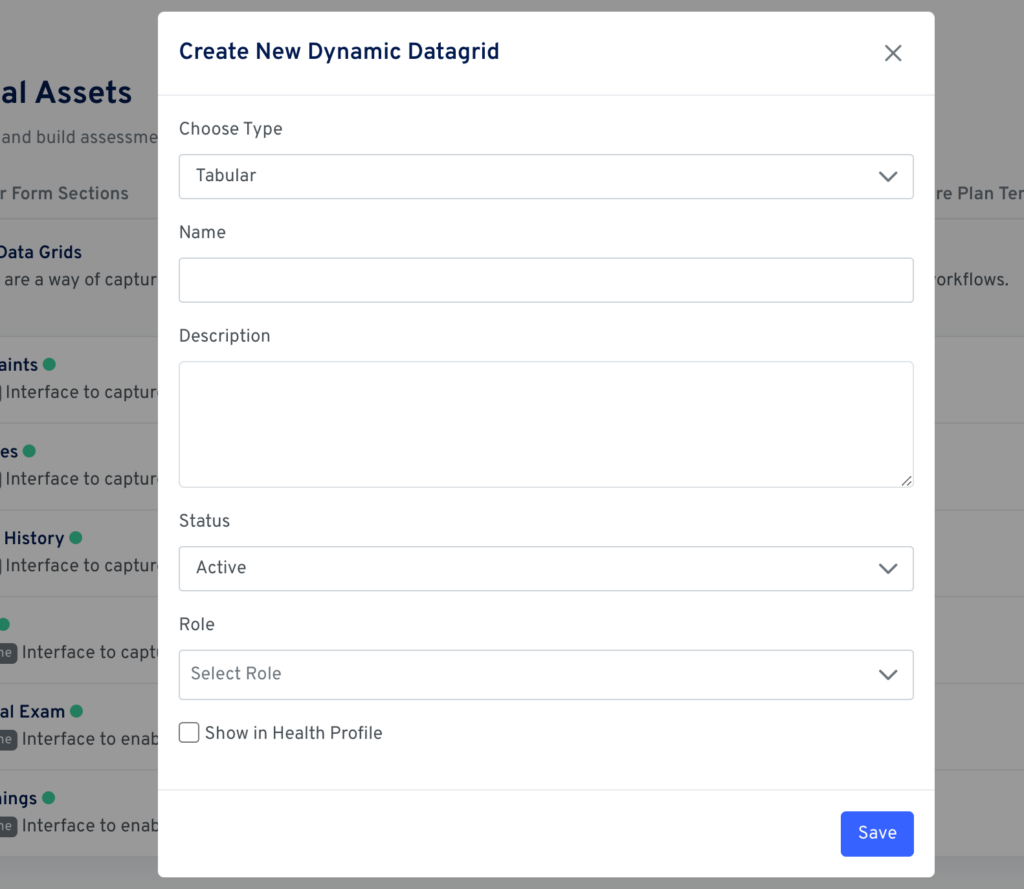
If creating a new Dynamic Datagrid, several selections are required to get started:
- Choose Type
- Tabular
- This datagrid intends to allow entry where multiple records of data of the same format will be expected
- Multi-row
- This datagrid intends to allow entry where only one record of data is expected
- Tabular
- Name
- Description
- Status (by default: newly created Datagrids will be in the “Active” status, if you wish to disable them at a later time, this status can be changed to “Disabled”)
- Show in Health Profile – when selected, the datagrid will be made available within the Health Profile tab of the longitudinal member record
Building Tabular Dynamic Datagrids
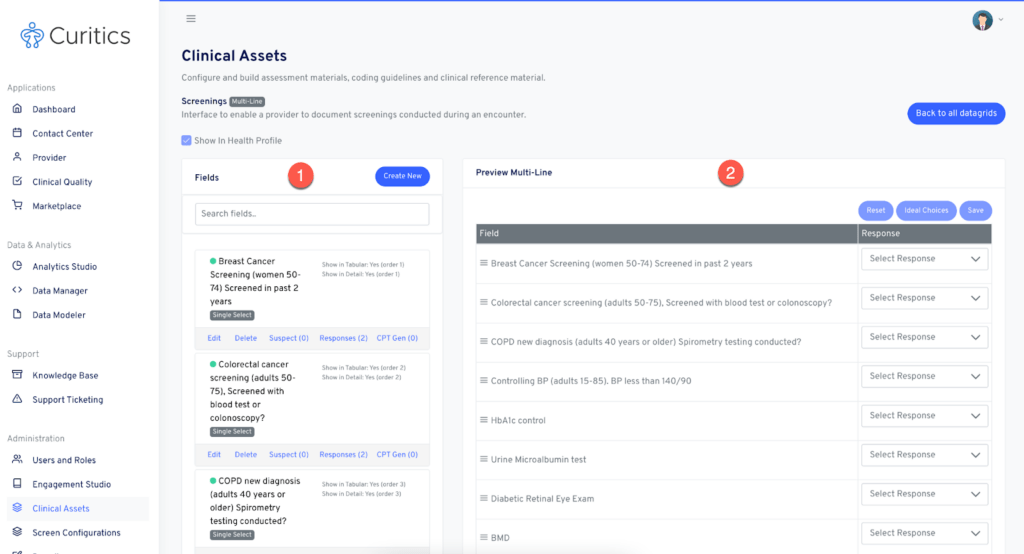
Tabular Datagrids are useful where entry is expected to consist of multiple records of data. The authorship interface is divided into three main components.
- A panel where fields can be created, ordered and edited
- A preview panel of the tabular interface
- Field order can be adjusted via drag and drop within this panel
- A preview panel of the data entry and editing interface
- Field order can be adjusted via drag and drop within this panel

Building Multi-Row Dynamic Datagrids
Multi-row Datagrids are useful where entry is expected to consist of a single record of data. The authorship interface is divided into two main components.
- A panel where fields can be created, ordered and edited
- A preview panel of the data entry and editing interface
- Field order can be adjusted via drag and drop within this panel
Creating and Editing Fields
Datagrids can consist of multiple types of user input. Creating user input structures starts by setting up fields. Curitics Dynamic Datagrids support a wide degree of fields types including:
- Text Input (a single-line free-form text input)
- Textarea (a multi-line free-form text input)
- Single Select (selection of a single predefined response)
- Multi Select (selection of multiple predefined responses)
- Date (entry of a date)
- Look-Up (the ability to search a master data set)
- Calculated (a calculation based upon user entry)
- Electronic Signature
Creating and Editing Fields
Fields can be created by clicking the “Create New” button in the header of the Fields panel. Fields can be later edited by choosing the “Edit” option below each field summary.
Upon clicking the “Create New” field button users are prompted to choose the field type they wish to create.
Text Input Fields
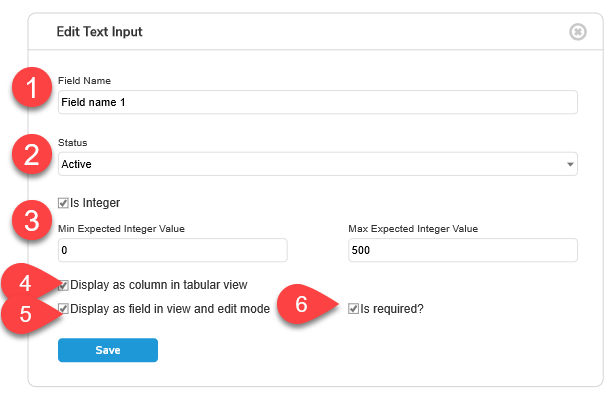
Text input fields allow single-line free-form responses to be captured in datagrids. Several options are available when creating text input fields:
- Field name – specify the name of the field
- Status – by default newly added fields are in the “Active” status, users can choose to disable fields while subsequently editing
- Is Integer – choose if a number is the expected entry
- On the basis of selecting this option validation can be configured around expected entry by completing the following inputs
- Min Expected Integer Value
- Max Expected Integer Value
- On the basis of selecting this option validation can be configured around expected entry by completing the following inputs
- Display as column in tabular view – applicable to tabular Datagrids, enables the field to display within the tabular view representation of the Datagrid
- Display as column in tabular view – applicable to tabular Datagrids, enables the field to display within the tabular view representation of the Datagrid
- In required – selecting this option will require input into the field prior to being able to save the record
Clicking the “Save” button will save the field parameters.
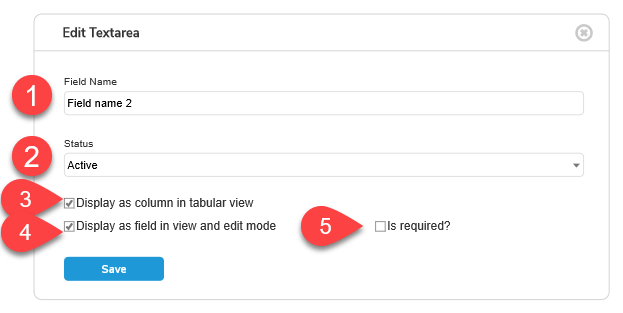
Textarea Fields
Textarea fields allow multi-line free-form responses to be captured in datagrids. Several options are available when creating text area fields:
- Field name – specify the name of the field
- Status – by default newly added fields are in the “Active” status, users can choose to disable fields while subsequently editing
- Display as column in tabular view – applicable to tabular Datagrids, enables the field to display within the tabular view representation of the Datagrid
- Display as column in tabular view – applicable to tabular Datagrids, enables the field to display within the tabular view representation of the Datagrid
- In required – selecting this option will require input into the field prior to being able to save the record
Clicking the “Save” button will save the field parameters.
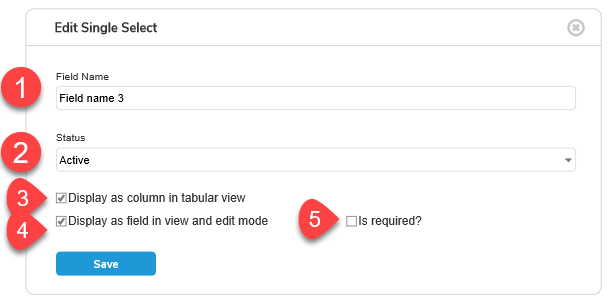
Single Select Fields
Single select fields allow entry of a single predefined response. Several options are available when creating single select fields:
- Field name – specify the name of the field
- Status – by default newly added fields are in the “Active” status, users can choose to disable fields while subsequently editing
- Display as column in tabular view – applicable to tabular Datagrids, enables the field to display within the tabular view representation of the Datagrid
- Display as column in tabular view – applicable to tabular Datagrids, enables the field to display within the tabular view representation of the Datagrid
- In required – selecting this option will require input into the field prior to being able to save the record
Clicking the “Save” button will save the field parameters.
Multi-select Fields
Multi select fields allow entry of multiple (1 or more) predefined responses. Several options are available when creating multi select fields:
- Field name – specify the name of the field
- Status – by default newly added fields are in the “Active” status, users can choose to disable fields while subsequently editing
- Display as column in tabular view – applicable to tabular Datagrids, enables the field to display within the tabular view representation of the Datagrid
- Display as column in tabular view – applicable to tabular Datagrids, enables the field to display within the tabular view representation of the Datagrid
- In required – selecting this option will require input into the field prior to being able to save the record
Clicking the “Save” button will save the field parameters.

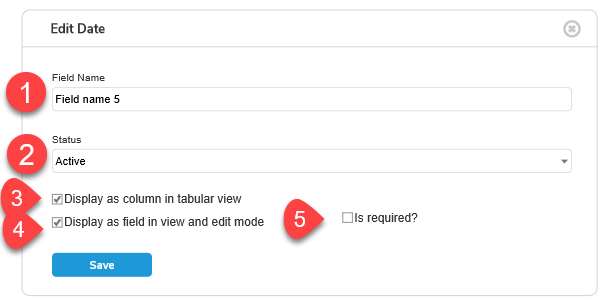
Date Fields
Date fields allow date responses to be captured in datagrids. Several options are available when creating date fields:
- Field name – specify the name of the field
- Status – by default newly added fields are in the “Active” status, users can choose to disable fields while subsequently editing
- Display as column in tabular view – applicable to tabular Datagrids, enables the field to display within the tabular view representation of the Datagrid
- Display as column in tabular view – applicable to tabular Datagrids, enables the field to display within the tabular view representation of the Datagrid
- In required – selecting this option will require input into the field prior to being able to save the record
Clicking the “Save” button will save the field parameters.
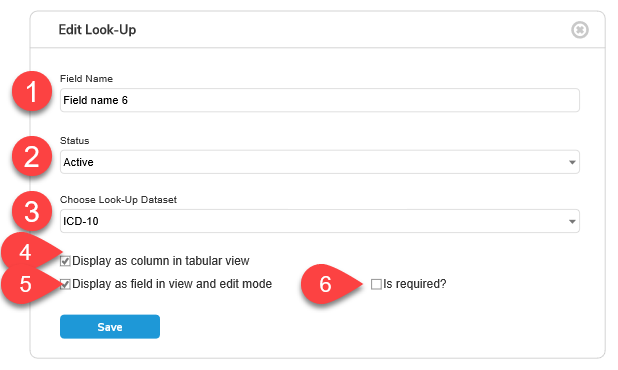
Look-up Fields
Look-up fields allow single selection of an applicable value from a master data set. Several options are available when creating look-up fields:
- Field name – specify the name of the field
- Status – by default newly added fields are in the “Active” status, users can choose to disable fields while subsequently editing
- Choose Look-up dataset – choose the look-up dataset to reference
- The following look-up datasets are available
- ICD-10
- CPT
- Medications
- The following look-up datasets are available
- Display as column in tabular view – applicable to tabular Datagrids, enables the field to display within the tabular view representation of the Datagrid
- Display as column in tabular view – applicable to tabular Datagrids, enables the field to display within the tabular view representation of the Datagrid
- In required – selecting this option will require input into the field prior to being able to save the record
Clicking the “Save” button will save the field parameters.
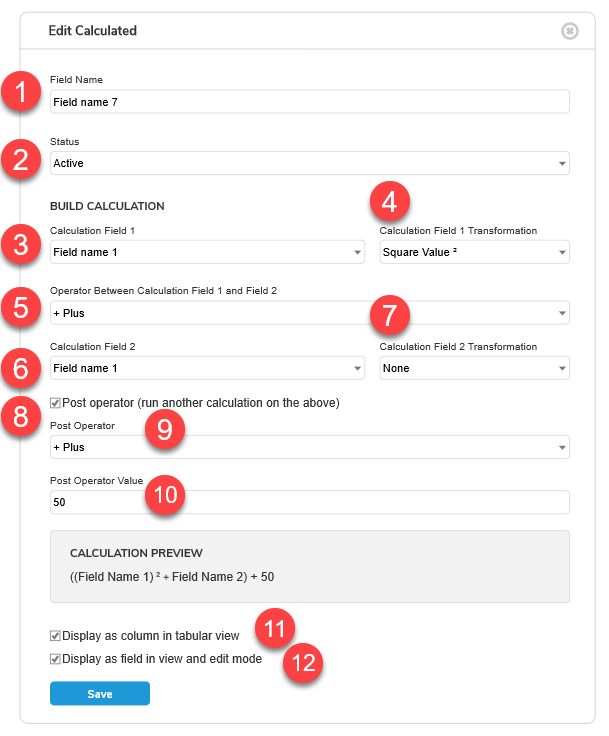
Calculated Fields
Calculated fields allow for real time calculations to execute based upon user input in 2 fields already implemented in the datagrid. Several options are available when creating calculated fields:
- Field name – specify the name of the field
- Status – by default newly added fields are in the “Active” status, users can choose to disable fields while subsequently editing
- Calculation Field 1 – choose the first field which should be considered within the resulting calculation output
- All text input fields set to “Integer” within the datagrid are available as selectable options
- Calculation Field 1 Transformation – apply a transformation to Calculation Field 1
- Currently supported transformations: Square value
- Operator Between – choose the operator to utilize in the calculation between field 1 and field 2
- Currently supported operators include
- + Plus
- – Minus
- / Divide
- * Multiply
- Currently supported operators include
- Calculation Field 2 – choose the first field which should be considered within the resulting calculation output
- All text input fields set to “Integer” within the datagrid are available as selectable options
- Post operator – select if a secondary calculation will be utilized on the output of 3-6
- Post operator – choose the operator to utilize in the secondary calculation
- Post operator value – Enter the value to be used in the post operation
- Calculation Field 2 Transformation – apply a transformation to Calculation Field 2
- Currently supported transformations: Square value
- Display as column in tabular view – applicable to tabular Datagrids, enables the field to display within the tabular view representation of the Datagrid
- Display as column in tabular view – applicable to tabular Datagrids, enables the field to display within the tabular view representation of the Datagrid
Clicking the “Save” button will save the field parameters.
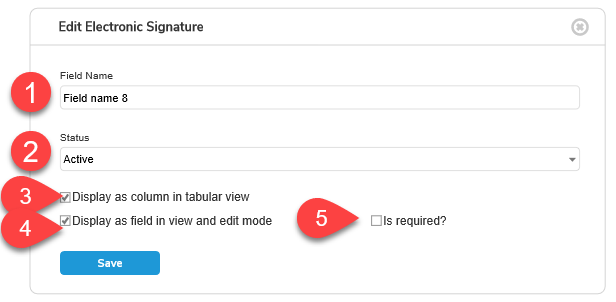
Electronic Signature Fields
Electronic signature fields allow for clinician signatures to be captured. Several options are available when creating electronic signature fields.
- Field name – specify the name of the field
- Status – by default newly added fields are in the “Active” status, users can choose to disable fields while subsequently editing
- Display as column in tabular view – applicable to tabular Datagrids, enables the field to display within the tabular view representation of the Datagrid
- Display as column in tabular view – applicable to tabular Datagrids, enables the field to display within the tabular view representation of the Datagrid
- In required – selecting this option will require input into the field prior to being able to save the record
Clicking the “Save” button will save the field parameters.
Deleting Fields
Datagrid authors can easily delete fields by clicking the “Delete” buttons below each field panel. It is important to note that if a field is in use, permanent data loss can occur. Curitics provides warning messaging to prevent accidental deletion.
Adding Response Values
Single Select and Multi Select field types enable multiple predefined responses to be curated. Clicking the “Responses” button at the bottom of the field panel allows response options to be configured.
This panel supports adding multiple response options and also organizing the display order of the response values in the field element.
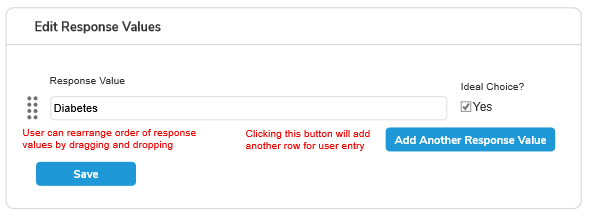
Additionally, users can check the “Ideal” choice option whereby the response will be defaulted in the datagrid.
Configuring Suspect Condition Generation
Suspect conditions can be generated based upon inputs to Dynamic Datagrids. Options to generate suspects are available in the following fields types
- Text Inputs
- Single Select
- Multi Select
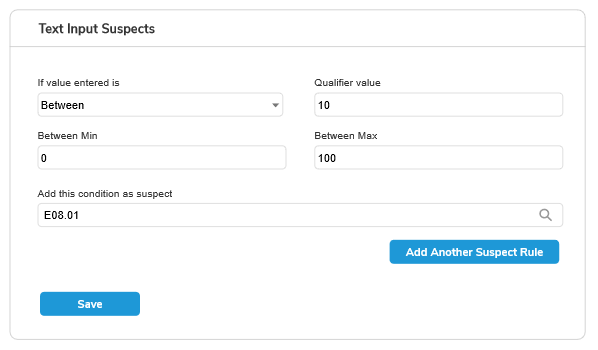
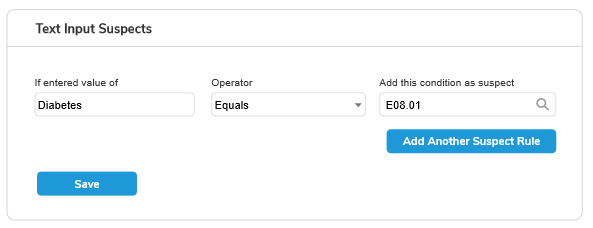
Adding Suspects within Text Fields
The suspecting interface will be modified if the Text Field is either set to capture text or integer values.
For integer values: multiple suspect rules can be configured for a single field. Two comparison values are selectable in the dropdown “If value entered is”. Users can choose between “Equals” for an exact match to the entered value or “Between” for a range match. If “Between” is selected two additional inputs are present to specify the minimum and maximum value for the range. The suspect can then be chosen by searching the ICD-10 library.
For string values: interface supports the ability to generate suspects on the basis of user entry equaling or not equaling an inputted value.
Adding Suspect within Single and Multi Select Fields
Suspecting rules can be configured to trigger on the basis of selections within single and multi select fields as well. To configure rules, choose the response value and look-up the ICD-10 code within the search interface.